
7 Ways To Fix Laptop battery plugged in not charging: Laptop is not charging even when the charger is plugged in is quite a common issue which a lot of user’s faces but there are different solutions working for different people. Whenever this error occur the charging icon shows that your charger is plugged in but not charging your battery. You can only see your laptop battery status remains at 0% even though the charger is plugged in. And you may be panicking right now but don’t, because we need to find the cause of the problem before the laptop shutdowns.

So we need to first find if this is a problem of the operating system (Windows) rather than the hardware itself and for that, we need to use Live CD of Ubuntu (alternatively you can also use Slax Linux) to test if you’re able to charge your battery in this operating system. If the battery is still not charging then we can rule out the problem of Windows but this means that you have a serious problem with your laptop battery and it might need a replacement. Now if your battery works as it should in Ubuntu then you can try some of the below-listed methods to fix the problem.
7 Ways To Fix Laptop battery plugged in not charging
Make sure to create a restore point just in case something goes wrong.
Method 1: Try to unplug your battery
The first thing you should try is removing your battery from the laptop and then unplugging all the other USB attachment, power cord etc. Once you have done that then press and hold the power button for 10 seconds and then again insert the battery and try to charge you battery again, see if this works.

Method 2: Remove Battery Driver
1.Again remove all the other attachment including power cord from your system. Next, take out the battery from the back side of your laptop.
2.Now connect the power adapter cable and make sure the battery is still removed from your system.
Note: Using laptop without the battery is not at all harmful, so don’t worry and follow the below steps.
3.Next, turn on your system and boot into Windows. If your system doesn’t start then this means there is some problem with the power cord and you might need to replace it. But if you are able to boot then there is still some hope and we may able to fix this issue.
4.Press Windows Key + R then type “devmgmt.msc” and hit Enter to open Device Manager.

5.Expand batteries section and then right click on “Microsoft ACPI Compliant Control Method Battery” (all occurrences) and select uninstall.

6.Optionally you may follow the above step to uninstall Microsoft AC Adapter.
7.Once everything related to the battery is uninstalled click Action from the Device Manager menu and then
click on ‘Scan for hardware changes.‘

8.Now turn off your system and re-insert the battery.
9.Power on your system and you may have Fix Laptop battery plugged in not charging issue. If not, then please follow the next method.
Method 3: Updating Battery Driver
1.Press Windows Key + R then type “devmgmt.msc” and hit Enter to open Device Manager.
2.Expand batteries section and then right click on “Microsoft ACPI Compliant Control Method Battery” (all occurrences) and select Update Driver Software.

3.Select Browse my computer for driver software.

4.Now click on Let me pick from a list of device drivers on my computer and click Next.

5.Select the latest driver from the list and click Next.
6.If ask for confirmation select yes and let the process update the drivers.

7.Now follow the same step for Microsoft AC Adapter.
8.Once done, close everything and reboot your PC to save changes. This step may be able to fix Laptop battery plugged in not charging problem.
Method 4: Reset your BIOS configuration to default
1.Turn off your laptop, then turn it on and simultaneously press F2, DEL or F12 (depending on your manufacturer)
to enter into BIOS setup.

2.Now you’ll need to find the reset option to load the default configuration and it may be named as Reset to default, Load factory defaults, Clear BIOS settings, Load setup defaults, or something similar.

3.Select it with your arrow keys, press Enter, and confirm the operation. Your BIOS will now use its default settings.
4.Once you’re logged into Windows see if you’re able to Fix Laptop battery plugged in not charging issue.
Method 5: Run CCleaner
1.Download and install CCleaner & Malwarebytes.
2.Run Malwarebytes and let it scan your system for harmful files.
3.If malware is found it will automatically remove them.
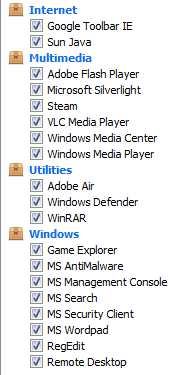
4.In the “Cleaner” section, under the Windows tab, we suggest checking the following selections to be cleaned:
5.Once you’ve made certain the proper points are checked, simply click Run Cleaner, and let CCleaner run its course.
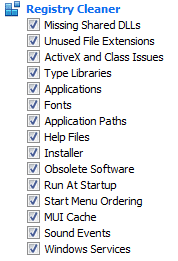
6.To clean your system further select the Registry tab and ensure the following are checked:
7.Select Scan for Issue and allow CCleaner to scan, then click Fix Selected Issues.
8.When CCleaner asks “Do you want backup changes to the registry?” select Yes.
9.Once your backup has completed, select Fix All Selected Issues.
Method 6: Download Power Manager for Windows 10
This method is only for people with Lenovo laptops and facing the battery issue. To fix your issue simply download Power Manager for Windows 10 and install it. Reboot your PC to save changes and your issue will be resolved.
Method 7: Run Windows Repair Install
This method is the last resort because if nothing works out then this method will surely repair all problems with your PC. Repair Install just uses an in-place upgrade to repair issues with the system without deleting user data present on the system. So follow this article to see How to Repair Install Windows 10 Easily.
Recommended for you:
- Fix Antimalware Service Executable High CPU Usage
- Reboot and Select Proper Boot Device Issue
- Fix Office 365 activation error We couldn’t contact the server
- Fix You need to upgrade your Adobe Flash Player
I hope the article ‘7 Ways To Fix Laptop battery plugged in not charging‘ have helped you fix your battery not charging issue but if you still have any queries regarding this guide then feel free to ask them in the comment’s sections.


This is quite helpful. I’ve been having this issue over and over again and haven’t been able to resolve this problem permanently. I have to keep removing and replacing the battery each time it shows the error.
Thank You!! So glad I stumbled upon this! Look at other sites and tried it and nothing work. I tried the step here and the same, didn’t work. However, Step 6 worked for me. I have a Lenovo and started experiencing this. Tried everything. I saw Step 6, and was like “hmmm, worth a shot” but was still skeptical about it working!! Especially the part “To fix your issue simply download Power Manager for Windows 10 and install it. Reboot your PC to save changes and your issue will be resolved.” But that is exactly what happened! Screw CNET. lol
what I did in case anyone else has the problem
1. Download the driver
2. unplugged the adapter,
3.install driver (i didn’t need to uninstall previous)
4. Restart computer
5. Plugged in adapter
6. Now it’s charging!
THANK YOU THANK YOU THANK YOU!
thanks, thanks thanks. thank you a million times. if it weren’t for this website, my mom would have killed me